











How to Choose a Vacuum Suction Cup and Ejector: A Simple Guide

If you’re building a vacuum gripper to move parts — boxes, sheet metal, glass, plastic, or anything else — it’s important not to guess, but to actually calculate. A calculation mistake leads either to the part falling, or to you overpaying for equipment that’s more powerful (and expensive) than you actually need.
In this article, we’ll walk through, step by step, how to properly select a vacuum suction cup and a vacuum generator (ejector) — in plain language, without unnecessary theory. If you’re using a vacuum pump instead of an ejector, some of the steps below (the ones related to the generator itself) can be skipped — the pump is selected separately, while the cups and holders are calculated exactly the same way.
Step 1. Figure out how much force is needed to hold the part
The first thing you need to know is how much force (in newtons) the suction cup must generate so the part doesn’t come loose during movement.
This force is affected by:
- the mass of the part — the heavier it is, the more force is needed;
- acceleration during movement — the more abruptly the gripper starts and stops, the higher the load (a smooth drive means lower requirements; a fast pneumatic cylinder or a rotary mechanism means higher requirements);
- how the cup is oriented and which way the part moves — a cup is loaded differently depending on whether the part is lifted straight up, pulled sideways, or flipped over;
- friction between the cup and the surface — on a slippery, oily surface, friction is low, and the cup has to hold the part almost entirely through vacuum alone;
- safety factor — typically a margin of 1.5 to 2 times is applied, to account for vibration, surface irregularities, and calculation errors.
In short: the heavier and more “abruptly” the part moves, and the more slippery its surface, the more suction cups you need — or the bigger they need to be.
Step 2. Determine how deep a vacuum you need
Next, you need to figure out how deep a vacuum level actually makes sense to pull under the cup. What matters here isn’t just holding force, but also the surface of the part itself:
- smooth, non-porous surface (metal, glass, glossy plastic) — a medium vacuum level is usually enough;
- rough or textured surface (unfinished wood, ground concrete) — a deeper vacuum is needed to compensate for imperfect contact;
- porous material (cardboard, fabric, particle board) — here the vacuum needs to be as deep as possible, since air is constantly leaking in slightly through the material.
An important nuance: the deeper the vacuum, the faster the cup wears out, and the more energy the system spends creating it. So don’t overestimate the vacuum level “just to be safe” — it’s better to compensate for a lack of force by adding more cups or using larger ones.
Step 3. Choose the number, size, and shape of the suction cups
Once you know the required holding force and vacuum level, you can select the actual suction cups.
How many cups you need. The greater the required force, and the larger or more irregular the part, the more cups it makes sense to use — this not only increases total force, but also makes the grip more stable and spreads the load more evenly.
What size. The rule here is simple: one large cup produces the same force as several small ones, but a large cup struggles more on an uneven or curved surface, while small cups are easier to position around the contour of a complex part.
What shape:
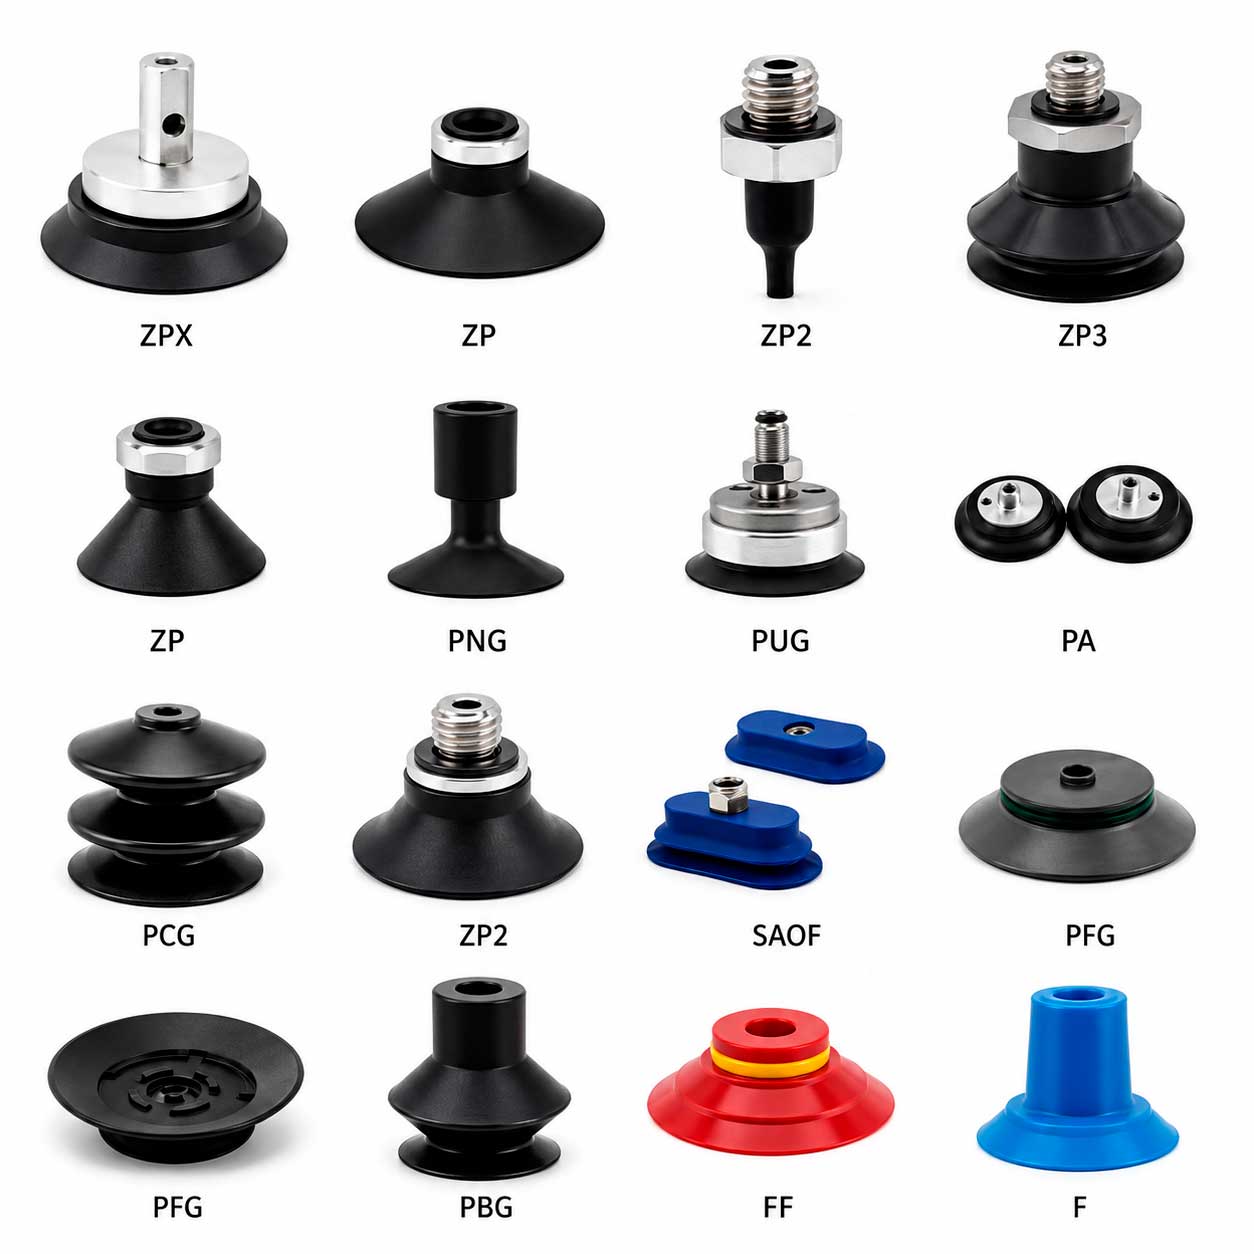
- standard (flat) — for flat or nearly flat surfaces;
- deep — for slightly convex, rounded surfaces;
- bellows (corrugated) — essentially a cup with a built-in “spring” that compensates on its own for tilt or height differences. Cups with a small number of folds work well on angled and rounded surfaces, while cups with a larger number of folds are used for fragile or spherical objects (glass jars, light bulbs, fruit, and so on), since this type of cup gently wraps around the shape instead of creating localized pressure;
- oval — convenient for narrow, elongated parts (pipes, profiles) or for surfaces with holes and recesses, where a round cup simply wouldn’t fit.
Step 4. Choose the suction cup material
The cup material is selected based on the working conditions:
- temperature of the part — at high temperatures, not all materials keep their elasticity;
- contact with oils, alcohol, acids, or alkalis — different materials have different chemical resistance;
- fragility of the part — fragile objects need a softer, more elastic material;
- special requirements — for example, anti-static properties (for electronics) or food-safe materials (for food products).
In simple terms: for “ordinary” industrial tasks without aggressive chemicals, a universal elastic material works fine, but for work involving oil, high temperature, or fragile parts, it’s worth checking the specific cup material’s compatibility with your particular conditions — resistance data for various factors is usually listed in the suction cup manufacturer’s catalog.
Step 5. Choose the suction cup holder
The holder isn’t just a mounting piece — it often performs an important engineering function: compensating for a small difference in height or tilt angle between the cup and the part’s surface (for example, if the part is slightly warped or not mounted perfectly flat). The type and travel of the holder are chosen based on how large the expected deviations are and how much space is available for mounting.
Step 6. Choose the vacuum generator (ejector)
This is arguably the most critical step if the system is built around ejectors rather than a vacuum pump.
The logic is simple: the ejector must be able to evacuate the entire volume of the vacuum line (cups + holders + hoses) down to the required vacuum level within the time allotted for one gripping cycle. Usually only a fraction of a second is allowed for this — the entire part-transfer cycle might take one to two seconds, and only a small portion of that is reserved for the actual vacuuming.
To figure out which ejector will work, you need to:
- Calculate the total volume of the line — the volume of all the cups plus the volume of the hoses between the cups and the ejector (the longer and thicker the hose, the greater the volume, and the longer vacuuming will take).
- Compare this volume to the required vacuuming time — this gives you the time in which the ejector needs to evacuate a notional one-liter volume.
- Based on this figure (usually called the ejector’s evacuation time), select a specific model from the manufacturer’s catalog — each model has a technical chart showing vacuum level versus time.
It’s also worth remembering: the longer and narrower the hose between the cup and the ejector, the higher the air resistance in the line — as a result, the actual vacuum depth (and therefore the holding force) may end up lower than calculated, and the evacuation time longer. This matters especially when the contact between the cup and the part isn’t perfectly airtight.
You should also factor in the altitude at which the equipment operates: the higher the altitude, the lower the atmospheric pressure, and the smaller the pressure differential the cup can create. When moving equipment from lowland to a mountainous area, the ejector’s supply pressure usually needs to be reduced to get back to the optimal operating point.
Step 7. Check whether a blow-off pulse is needed
Once the part has been transferred, the vacuum under the cup needs to be released quickly, so the part detaches on time and doesn’t linger on the cup for an extra fraction of a second. This is done either through a built-in release function in the ejector itself, or via a separate valve that abruptly feeds compressed air into the line. This kind of pulse matters especially where cycle speed is critical — for example, on a conveyor line with many operations per minute.
Step 8. Choose the layout: separate ejectors or one shared unit
There are two approaches here:
- one small ejector per cup — simple and cheap to buy per unit, but with a large number of cups it can become excessive in terms of air consumption and the number of separate components that need to be installed and maintained;
- one shared ejector with built-in functions (valve, vacuum switch, adjustments) for the whole gripper — usually more expensive per unit, but often more efficient in terms of air consumption, more compact to install, and easier to maintain.
Which option is better depends on the number of cups, how intensively the system is used (cycles per minute), and what matters more to you: the lowest purchase price right now, or long-term savings on compressed air. If the equipment runs almost continuously, many hours a day, the air savings from a more efficient shared ejector usually pay for themselves within one to two years.
Step 9. Check whether an air-saving mode is worth it
If the part-transfer time is noticeably longer than the actual vacuuming time (and it usually is), it’s worth considering ejectors with an air-saving mode. This type of ejector doesn’t consume air continuously while holding vacuum — instead, it only “tops it up” periodically, as needed — which can cut compressed air consumption several times over. Models with this feature cost more, but with a high number of work cycles per shift, the price difference is paid back through air savings — sometimes within just one to two years of operation.
Step 10. Don’t forget the accessories
A complete vacuum system typically also includes:
- a filter — protects the ejector and cups from dust and dirt in the ambient air;
- a vacuum safety valve — keeps holding the part even if there’s a brief drop in compressed-air line pressure;
- a silencer — reduces the noise from the ejector’s exhaust;
- a vacuum sensor (switch) — confirms that the required vacuum level has actually been reached before the gripper starts moving with the part.
Bottom line
Correctly sizing a vacuum system comes down to a sequence of simple steps: first calculate the required holding force, then choose the right vacuum depth for the specific surface, then select the number, size, shape, and material of the suction cups along with their holders, and only after that pick the right ejector based on line volume and the required cycle speed. It’s also worth checking separately whether a blow-off pulse is needed and whether an air-saving mode is justified — with intensive operation, it often pays for itself fairly quickly.
If you’d rather not calculate everything by hand, it’s easier to use a ready-made vacuum system calculator, which already accounts for most of the rules described above and suggests suitable cups and an ejector based on your input data.